viernes, 28 de abril de 2017

Delicje o Jaffa cakes. Galletas con gelatina y chocolate


Cuando era niña, los Delicje (Jaffa cakes en inglés) eran mis galletas favoritas. La base esponjosa de bizcocho, encima una capa de gelatina de sabores (la de naranja la mejor) y todo bañado en el chocolate. Era capaz de comer todo el paquete de una vez. Ahora, cada vez que lo pruebo, me doy cuenta que saben más y más a galleta “industrial” y pierde esta esencia de exquisitez.
He decidido encontrar este sabor único haciendo las galletas caseras. Os recomiendo intentar a buscar los sabores de la infancia porque merece la pena. ¡Salieron riquísimos!

 Ingredientes:

4 huevos, claras separadas de las yemas
80 g de azúcar
100 de harina de bizcocho tamizada
2 paquetes de gelatina de sabor favorito
Chocolate negro y nata para montar

Preparación

Primero, empezamos con la gelatina. Dos paquetes los disolvemos en un vaso de agua hirviendo. Mezclamos hasta total disolución y la repartimos entre los platos o bandejas planas. La altura de gelatina no debe ser más de 4 mm. La metemos en la nevera.
Batimos las claras a punto de nieve, añadimos el azúcar y batimos hasta obtener la masa brillante. Añadimos la yemas una tras una, luego la harina tamizada y mezclamos bien. La masa la metemos en la manga pastelera y hacemos unos círculos encima del papel del hornear. Repartimos un poquito con el dedo mojado para que estén más planas y metemos al horno a 180º unos 15 minutos hasta que se doren. Ojo, que se queman con facilidad.
Cuando se enfrían, recortamos círculos de la gelatina, más pequeños que la base, y colocamos encima. Todo bañamos en chocolate derretido con un poquito de nata para montar. Dejamos que cuaje y ¡a disfrutar!
Los círculos de bizcocho se pueden usan para todo tipo de postres – tiramisú, como base de un postre, mezclado con frutas o galletas para niños.

ENGLISH

When I was a kid, I loved Jaffa cakes. The fluffy base of biscuit, then a layer of flavour jelly (the orange one the best) and all covered in chocolate. There was nothing better for a glutton like me! But, sadly, every time I come back home and I try the mini cakes, they taste more and more “industrial” and they have just lost their magic,
So, pursuing childhood memories, I have decided to make my own version of Jaffa cakes. And I encourage each and every one of you to do the same – the reward is delicious!

Ingredients:

4 eggs, whites and yolks separated
80 g of sugar
100 g of sifted self-rising flour
2 packages of jellies, favourite flavour
Chocolate and whipped cream

Preparation

First, dissolve the jellies in a cup of hot water till its full dilution. Then divide into shallow containers. The height cannot be higher than 4 mm. let it cool in the fridge.
Beat the whites till white and add sugar. When the batter is stiff and shiny, add yolks one by one, mixing gently. Then add sifted flour, mix and put the batter into pastry bag and make circles on the baking paper. With a help of wet finger level them and bake for 15 minutes in the oven preheated to 180ºC. Be careful, they burn really easy!
Once cooled down, cut circles in the jelly (smaller than the base) and put them on the sponges. Then cover everything with melted chocolate mixed with cream.

The sponge circles can be used for different desserts like tiramisu, cake base o mix with fruits, as a baby food etc. 

miércoles, 12 de abril de 2017

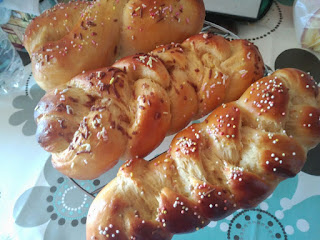
Monas de Pascua - Valencian Easter Buns


Me encantan las monas de Pascua. Es curioso que sea una tradición solo en la región de Valencia. Y, de ser de Valencia, lleva ligero aroma de naranja gracias a la ralladura de naranja.
Se pueden comprar hechas, pero a mí me gusta hacer las cosas a mi manera. Y aquí os dejo la receta que me encantó y las monas salieron riquísimas.

Ingredientes:

Masa Madre:

100 g de harina de fuerza
10 g de levadura fresca
100 ml de agua

Monas:

410 g de harina de fuerza
20 g de levadura fresca
3 huevos batidos
80 g de azúcar (en la receta original ponía 140g)
80 ml (72g) de aceite de oliva
Ralladura de una naranja
1 cucharadita de agua de azahar

Preparación:

El día antes hay que preparar la masa madre. Mezclamos todos los ingredientes en un bol, tapamos con film transparente y dejamos toda la noche fuera de la nevera.

El día siguiente batimos los huevos con azúcar, añadimos ralladura de naranja, agua de azahar, aceite, harina, levadura fresca y masa madre. Amasamos un momento – la masa al principio es muy pegajosa, hay que tener paciencia y no añadir más harina.

Cuando la masa deje de pegarse y esté bien elástica, la volvemos a meter en el bol y tapamos con un pañuelo ligeramente mojado para que no se seque la masa. Dejamos reposar una hora o hasta que doble su tamaño.

Pasado este tiempo, amasamos la masa ligeramente y empezamos a hacer las monas. Le podéis dar la forma la que queráis. Yo me decidí a la forma de pan quemado y trenzas. Las colocamos en la bandeja de horno y dejamos reposar una media hora para que crezcan.

Calentamos el horno a 180ºC, pintamos las monas con huevo batido, decoramos con virutas de chocolate o colores y metemos al horno unos 15 – 20 minutos, dependiendo del horno. Eso sí, es mejor tener preparado el spray con agua para crear vapor – eso ayuda que las monas crezcan mejor y tengan mejor miga.

Para comprobar si están hechas – cogemos una y damos pequeños golpes por debajo. Si suena hueco, ya están hechas.


 ENGLISH

Monas de Pascua is a traditional bake for Easter in Valencia region. These buns are mostly slightly sweet, sold with cooked or chocolate egg. As it is a Valencian product, you can taste orange flavour. Eating monas is the best way to welcome spring – in Easter it is tradition to enjoy monas with friends while admiring the beauty of spring during a long walk o hiking.

Ingredients:

Starter:
100 g bread flour
10 g of fresh yeasts
100 ml of water

For the monas:

410 g bread flour
20 g of fresh yeasts
3 eggs, beaten
80 g of sugar
80 ml (72 g) of olive oil
Orange zest of one orange
15 ml of orange blossom water

Preparation:

Starter must be prepared the day before. For that we mix all the ingredients in a bowl and we cover it with plastic film. Leave it outside the fridge for at least 10 hours, preferably all night.

The next day we prepare the dough. Beat the eggs with sugar till pale and add orange blossom water, orange zest, olive oil, yeasts and bread flour. Now, we have to knead it – the dough is sticky and you have to be very patient. Do not be tempted to add more flour.

When the dough stops to be sticky and is elastic, it´s time to leave it to rise. It might take an hour or more to double its size. Cover it with slightly wet kitchen cloth to not let the dough dry.

When it´s ready, knead it a little and you can start creating the monas. I opted for buns in form of round and braided bread. Put it on a baking tray and leave it to rise again, this time more or less half an hour.

Meanwhile, preheat the oven to 180 ºC. Brush the buns with beaten egg, decorate with colourful sprinkle and bake about 15 – 20 min until golden brown. Just have prepared a spray bottle with water to create a steam in the oven - humidity let the buns rise better and a consequence, have better crumbs. 


They are ready, if once knocked at the bottom, sound hollow. 


Receta original: 
http://www.lolitalapastelera.com/detalles/76/mona-de-pascua-valenciana/

lunes, 3 de abril de 2017

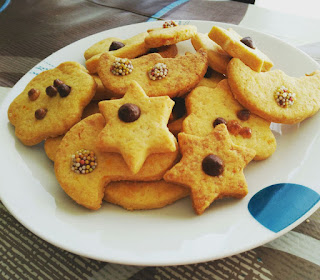
Galletas de mantequilla - Buttery cookies

I am a cookie monster! Literalmente. Me encantan las galletas. Sobre todo para la hora de merienda con un vaso de cacao o una buena taza de té de frutas.
Lo  genial de estas galletas es que puedes hacerlas con los niños – las pueden decorar, recortar diferentes formas. ¡Diversión garantizada!

Ingredientes:
8 cucharadas de mantequilla blanda
2/3 vaso de azúcar glas
1 huevo grande
¼ cucharadita de extracto de vainilla (yo lo he sustituido por piel rallada de una naranja)
2 ½ vasos de harina normal
Pizca de sal
Para decorar: gotas de chocolate, azúcar (antes de meter al horno)
Glaseado de colores, bolitas, virutas de colores (después de hornear)

Preparación
Batir la mantequilla con el azúcar, añadir el huevo, mezclar bien con las baritas. Ahora añadimos harina y sal y mezclamos con una cuchara hasta obtener una bola.
Con la ayuda de rodillo, lo expandimos a un grosor de 3 mm y recortamos las formas que nos gustan. Colocamos en las bandejas del horno y horneamos a 190ºC unos 10 – 12 min (depende del horno, las galletas deben estar doradas).

Dejamos enfriar y a ¡comer! o ¡decorar! :D


I am a cookie monster! Cookies are the perfect idea for the afternoon snack with a glass of cocoa or a nice cup of tea.
These little ones are perfect to make them with children. For them it’s a great fun to decorate, cut forms and use their imagination.

Ingredients:
8 tbspoons of butter at room temperature
2/3 cup of confectioner’s sugar
1 large egg
2 ¼ cup of all-purpose flour
¼ tspoon of vanilla extract ( I used grated zest of one orange instead) 
Pinch of salt

Preparation:
Beat the butter with sugar until fluffy and pale. Then add the egg and mix well. Now add the flour with salt and mix with a help of a spoon till it forms a ball (add some flour if needed).
Now it’s time to roll out the dough to about 3 mm thickness. Using different forms cut the cookies and place them on the baking trays. You can put some chocolate chips to decorate.

Bake around 10 – 12 minutes (cookies must be golden brown) in the oven preheated to 190ºC.
And it’s time to decorate!